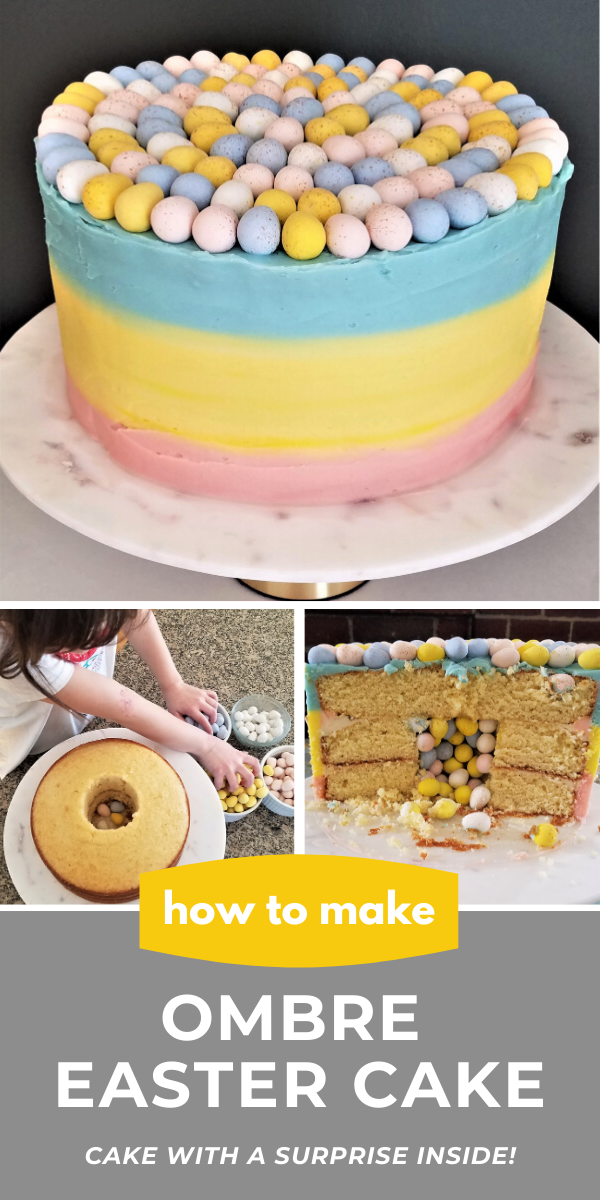
How To Make An Ombré Easter Cake
If you follow my personal account on Instagram you probably know that I have a thing about cake. I have always enjoyed baking but since becoming a parent, it’s turned out to be a great activity with Laurel and Violet—especially since I’m not great at sitting on the floor playing dolls or whatever—and it’s proven to be a real source of creative therapy for me.
A couple of years ago I shared a tutorial for this beautiful ombré Easter cake. It was so pretty and fun and festive so I wanted to re-up it in case you are looking for a fun, colorful project to get into this week!
You will need:
1.5 of your favorite vanilla cake recipe (or boxed mix is fine); I used Martha Stewart’s simple layer cake *You can also just double the recipe and let your kids decorate the extra layer or turn it into cupcakes
Three 8-inch cake pans
A double recipe of basic buttercream
Icing colors (3 of your choice)
2 bags of Cadbury mini eggs
Instructions:
1. Bake your cake layers
There’s no shame in box mix, but I love Martha Stewart’s simple layer cake; it’s a super easy, delicious yellow layer cake recipe. The original recipe creates two cake layers and you need three for this cake design; hence the need to make 1.5 the recipe, which you need to give enough height for the egg filling. Note that you will need three 8-inch cake pans (or you will need to wash one out and bake the third layer later).
2. Make your buttercream
The frosting that goes with Martha’s simple layer cake is delicious but I have repeatedly had trouble with lumps in cream cheese frosting, even when both the butter and cream cheese are at room temperature, which is a problem if you want to scrape really flat, smooth cake sides. If you look at this Valentine’s cake you will see the lump issue. So instead I went for a basic buttercream recipe; double it.
3. Color buttercream
Reserve about a cup or so of plain buttercream then divide the remaining buttercream into three bowls, allocating a bit more frosting to whatever will be the color of the top of the cake. For example, I wanted to do pink (bottom), yellow (middle), blue (top) so I made a bit more blue. Just start with a little bit of color, especially if you are using Wilton gels, which are super-saturated...you can always add more color but it’s hard to make frosting less colored (unless you have a lot of extra white).
4. Sort Cadbury mini eggs
Sort eggs by color (white, pink, yellow, blue), removing chipped, broken eggs as you go. This is a good task for your kid(s)!

How To Make An Ombré Easter Cake: Get your kids to sort eggs!
5. Assemble cake layers 1 + 2
Put a small blob of frosting on the center of your cake plate to keep the cake from moving. Put your first layer on the cake stand and frost (level a bit off the top with a serrated knife if you have a big dome). Place your second layer on top and level with a serrated knife if you have considerable dome.

How To Make An Ombré Easter Cake: Kids can also help with icing
6. Cut + load your egg hole
Use a biscuit cutter or a drinking cup as a guide to cut a hole about 3-4 inches wide in the two set layers. Fill to the top of the hole with an assortment of eggs (I used more of whatever color we had the most of).

How To Make An Ombré Easter Cake: Create a surprise inside!
7. Finish basic cake assembly
Frost the top of the second layer. Level the top of the third layer if necessary then place it FACE DOWN so that the perfectly flat bottom becomes your top. Spread a thin layer of frosting on top of the cake and around the sides. This is called the crumb coat because it catches any loose crumbs so they stay out of your final frosting job.
8. Create your gorgeous ombré effect
Load your 3 icing colors in piping bags with a big tip or just the top cut off the piping bag. Pipe thick stripes around the sides in your 3 color and cover the top. Smooth the top of the cake. Note: the top doesn’t need to be perfectly smooth since you’ll be topping the cake with eggs. Place cake on a turntable and slowly spin it while using a bench scraper to smooth out the sides. (After I had already made this cake I got the tip to heat up the scraper with hot water then quickly dry and use for a nice smooth finish.)

How To Make An Ombré Easter Cake: Before the beautiful flat icing is the lumpy stripes!
9. Arrange mini eggs
Start at the outside edge and go around and around until you reach the middle. I went with a 2-1 egg pattern; e.g., 2 blue, 1 white, 2 yellow, 1 white, 2 pink to start and then kept going, sometimes dropping the white (I didn’t have a ton of these) or sometimes switching the colors so they varied against each other as the rows started to build inward. The nice thing about not doing a perfect pattern is that you don’t need to stress if you run out of an egg color!

How To Make An Ombré Easter Cake: add eggs to the top
I was so thrilled about how this came out! And it was so fun to hear the kids (and adults!) squealing when they realized there were eggs inside the cake too!

How To Make An Ombré Easter Cake: The surprise inside!