
Fun & Simple Explorer Party
 Today, my girlfriend Leslie makes a special guest contribution, detailing a fun and simple Explorer Party she just threw for her son:
“I have two boys, and my oldest son Liam just turned 5. After attending a seemingly endless number of big parties at group venues (e.g., clay painting, climbing gym) with pizza and cake that no one ate, we decided we'd rather have a smaller party at home with a craft, a game, and lunch. Nothing too long so younger sibs could go home and nap, but lots of fun with time to do something creative, run around, and then sit and eat.
The party lasted about 2 hours, which was about enough time to hang out and before anyone started squabbling over toys, so everyone left happy. The craft and game were linked through an explorer theme: the kids made binoculars out of toilet paper rolls, and then used them in the scavenger hunt. The craft is not too long and complicated, adapts to both boys and girls, and to different ages in what materials you make available and how much time you devote to it during the party. The game is also pretty flexible - we played with two 3 year olds and 2 five year olds, but you could easily do this with a larger number, different ages, and both genders.
Explorer Binoculars
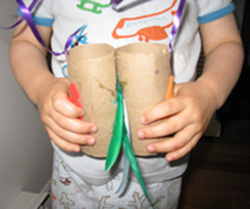
[Click thumbnail above to see enlarged picture of binoculars in action.]
For each child, you need 2 empty toilet paper rolls and a length of wool or ribbon. Then you need some shared craft supplies such as crayons, stickers, markers, feathers, etc. Keep in mind that you will be using the finished binoculars right away, so paint or lots of glue requiring drying time is not ideal. (Note: one option is using a glue gun, which should be handled by an adult since the glue gets very hot.)
For the 3 and 5 year olds, I stapled the two tubes side by side, one staple at each end. I then used a hole-punch to make a hole on the outer edge of each tube at one end, so I could string the ribbon through once the decorating phase was done. Then I laid out the supplies on the table for the kids to share (small pie tins work well for dividing supplies if sharing is an issue), with a set of unfinished binoculars at each place. The kids had a great time decorating the binoculars, and once they were finished, we made sure each one had the child's name on it, and strung the ribbon through the pre-punched holes. Older children may be capable of attaching the tubes together themselves, but this would add time to your craft.
Explorer Scavenger Hunt Game
Once the binoculars were made, I wanted to play a game in which the kids could use the binoculars they had just made. We gathered 9 household items such as a toy drum, dustpan, badminton racquet, teddy bear, kite, etc. and while the moms were helping the kids make the binoculars, the dads hid the objects out in the backyard. (Of course you could have these things hidden ahead of time, and if it rains then you could have them hidden around your house.)
Each child had a sheet with pictures of the items for them to find. I sketched simple line drawings of each object, but you could also use clip art or download simple images from the Internet. For older children, you could use smaller, harder to find items, and hide them in more difficult places. I glued the picture sheet to cardboard to make it easier for little hands to hang on to, and also to provide a hard surface so the child could check off items as they found them.
This was a great activity, especially outside, as kids could run around they yard, blowing off steam they had saved up while sitting and making the craft. The daddies supervised this game, while I stayed inside and changed the craft table into the lunch table. Don't underestimate the fun the kids had - Liam wanted to play this game again the next day.
Favor Bags
The weekend before the party we spent time with the boys painting brown paper bags with tempura paint to use as gift bags for party favors to give out at the end of Liam's party. It was a fun way to create an inexpensive gift bag while allowing me some fun creative time with the boys outside. The bags were filled with goodies like a ball you soak in water for pool time fun, glitter glue, stickers, and various other craft/toy items (no candy). To finish the bags, I folded over the top, double hole punched the folded over section and tied the bag closed with ribbon.

Expanding the Explorer Theme
You can add to the explorer theme by using explorer-type decorations (we just had balloons, my 5 year old's fave), a cake (two round cakes made to look like binoculars), and gift bags with bug catchers, magnifying glasses, and note pads for field notes. We found the kids were happy with what we did (the activities were age appropriate), and it was perfect for us since we don’t have the time or money for over the top parties.”