
DIY: Origami Advent Calendar
I love the idea of advent calendars, though I’m admittedly pretty meh about more sweets at this time of year, especially when it’s cheap chocolate! One year I decided to create something easy and pretty that focused on inspiring family togetherness and giving. I also was drawn towards crafting with origami since that’s something I hadn’t seen online. Laurel and I came up with this idea for an origami advent calendar and it is so beautiful and simple! Here’s the how-to (including the inspiration points for what to include inside the origami cups):
Materials:
24 sheets 8.5 x 11 inch paper
Contrast paper (optional)
2 sheets red paper
Rotary trimmer (optional, but makes things lighting quick)
Glue stick
Mini clothespins (or you could use small binder clips)
¼ inch ribbon
Steps:
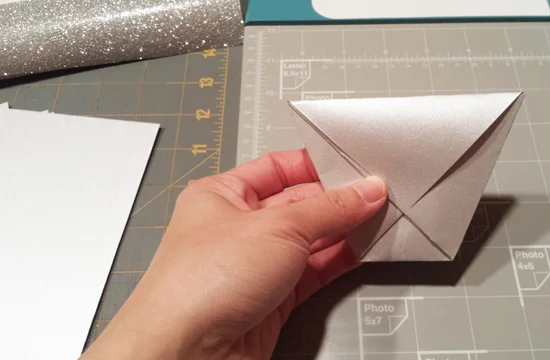
1. Make origami cups
Trim 24 sheets of 8.5 x 11 paper to 7-inch square pieces. We used shimmery silver and opal text weight paper. Fold the trimmed sheets into origami cups (you can skip step #2 as we did). Origami in 6 steps? Awesome. And quick!
2. Add contrast paper
This is an optional step, but Laurel and I wanted to add some sparkle! To cover the front triangle flap of each cup, cut 4 x 2 inch rectangles of your contrast paper (yes, I had a big roll of glitter wrap in my studio). Cover the triangle flap with glue, adhere rectangle contrast paper, then trim rectangle to fit triangle flap. Place cups under heavy books to set glue.

3. Hang the cups
Hang two staggered lines of ribbon; you can do this on a wall or across a wide doorway; we did it across the sliding doors to our backyard. Clip 11 cups to the top line and 13 to the bottom, staggering spacing.

4. Print and insert advent messages
In the spirit of less clutter and more holiday mindfulness, I wanted to focus our countdown on ideas that would inspire us to spend time together as a family and give to others; our list is below. I printed on red paper and set the paper slips to about 1.5 x 3.5 inches so we'd get a little color pop (though the cups/clothespins look beautiful without the red too). Feel free to swap in your own messages in this template (you’ll need to trim about .75 inch off the sides and .25 inch off the top of the 8.5 x 11 paper before trimming the individual slips).
Our 24 countdown items:
Decorate gingerbread houses (I picked up kits at Trader Joe's this weekend)
Make cookies for gifts
Make magic salt for gifts
Make trail mix for gifts
Call grandma and grandpa
Donate $10 to charity
Donate $20 to charity
Collect and donate canned goods
Collect and donate toys
Play a board game together
Do something nice for Dad
Do something nice for Mom
Do something nice for Laurel
Do something nice for Violet
Give holiday treats to neighbors
Make dinner together
Go for a hike or nature walk together
Craft something together
Bake something together
Make a holiday playlist
Send a card to a loved one
Take a family picture
Watch a movie together
Have a family dance party

I'm so thrilled with how this project came out! Laurel and I had such fun making it together, it didn't take a crazy amount of time, and it looks beautiful. I'm so looking forward to starting our family countdown on December 1!

DIY origami advent calendar