
DIY: Mummy Minion Door
When I saw this monster door on Pinterest, I immediately thought it would be cute to do something with minions. I originally thought about doing a full-out minion but then revised the idea to a mummy minion so I wouldn't need to measure out and buy lots of yellow and blue paper for the body + overalls. Since I always have a big roll of kraft paper in the house, we were able to do this project without having to make a craft store run! Here's how to make a mummy minion door:
Materials:
Brown kraft paper (I have a big 20-inch wide roll in my office)
8.5 x 11 sheets of construction paper: 4 black, 3 white, 1 brown, 3-4 yellow
Scissors
Packing tape
Glue stick
Steps:
1. Make the minion eyes + glasses
Cut out two black circles for the eyeglass frames (max size of paper), two white circles for the eyes, two brown circles for the irises, and two black circles for the pupils. I recommend tracing big pans or containers for the circles (instead of freehand cutting...which I tried first and came out terrible) since the circle eyes are such a defining feature. Also cut two strips (about 3 x 8.5 inches) for the eyeglass stems.
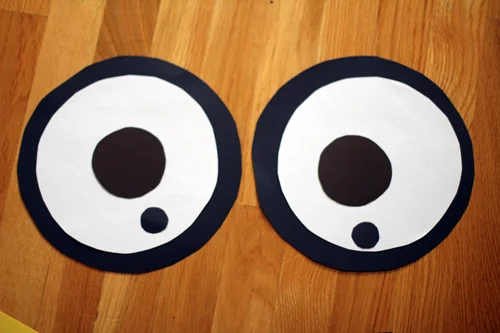
Mummy minion door eyes
2. Make the minion mouth
Pick your favorite minion mouth (we referred to a roll of minion duct tape for imagery). I freehand cut a set of teeth, glued it to black paper and then freehand cut a mouth shape.

Mummy minion door mouth
3. Make the mummy strips
Measure your door and cut several large sheets the width of your door (for our door we needed five 20 x 36 inch sheets). Then cut these sheets in half lengthwise on an angle (perfection not encouraged!). Tape the strips together, lining up the straight (uncut) edges parallel; you are now working on the back of the mummy wrap -- the flip side will show the uneven angles. We taped 3 strips for the section above the glasses and 7 strips for the section under the glasses. Flip the strips right side up and insert some rolled tape pieces into any overlapping paper sections that are gaping a lot, but don't seal the seams shut. You want it to look imperfect so it looks like mummy wrap.

Mummy minion door strips

Mummy minion door strips
4. Create the minion yellow part #1
With the mummy pieces right side up, decide how much yellow to expose around the eyes. Since we only had letter sheet yellow paper, we decided to show a fragment around the glasses instead of a big wide strip all the way across. Flip the sheets back over, wrong side up, line up the opening, and then tape yellow paper to fill the opening. You will now have one big piece. Trim to your door length if necessary. (Note: taping on the eyes and glasses is the very last step.)

Mummy minion door face
5. Add more minion yellow
To add a little more color pop, cut shards of yellow and insert/tape them along irregular edges.

Mummy minion door body
6. Measure and cut door hardware holes
Measure and cut out holes for your door hardware (e.g., knob, deadbolt). Hang and tape the mummy to the front door using packing tape around the edges and sides so as not to pull off any door paint.
7. Final assembly
Tape on the eyes and eyeglasses. We did this last to see how things would align with the deadbolt and it turned out we needed to cut one of the eyeglass stems to fit around the deadbolt.

Mummy minion door DIY
So cute, no? Let me know if you have questions! And now I'm thinking a couple of minion pumpkins will look super cute alongside the door!

Mummy minion door DIY