
Easy Staircase Gallery Walls
 One thing I have procrastinated on for over two years is hanging pictures in our home. But thanks to inspiration from a recent Life.Style episode (re: photo gifts and décor), this post on creating gallery walls, and probably the fact that we're entertaining a lot over the coming weeks, this weekend I got over my fear of hammer and nail. And now? My home is about 3000 times more cozy! I wanted to share the easy how-to for creating staircase gallery walls. Admittedly, I still leave the big hanging projects (as in, you need to find studs in the wall and wield a drill) to Jon, but I did a lot of hanging (here's everything we hung and how the project related to my life list).
When I saw the gallery walls post over at Little Green Notebook, I loved both the general technique shared (in short, laying out the gallery on a big banner, marking the hanging fixtures, hanging the paper, driving the nails, then ripping down the paper) and the look -- specifically, the validation that it can look cool to mix and match frame styles.
However, after discussing with Jon where different things were going to go in the big wall hanging project, we decided that the family photo gallery should ascend the staircase. So, I couldn't simply lay out a rectangle of paper as in the LGN post. However, I was determined to draw from the method. Here's how I did it -- it was ridiculously easy and turned out beautifully!
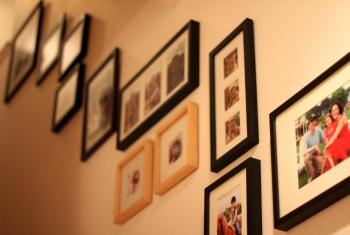
1. Collect framed photos. Most of my photos were black frames with white mats, but I did have a few other styles. (I recently purchased a bunch of inexpensive black/white frames at IKEA and printed out photos at home -- super easy and awesome looking.)
2. Measure or trace the frames on paper (I used brown kraft) and cut out the shapes. As you go, in the proper orientation of the photo, write in a Sharpie on the paper: A) the image (e.g., "Laurel on horse"); B) the frame style (e.g., black, natural, floating, etc.); and C) the point where the picture will hang (e.g., the suspension point if on a wire) -- essentially, where you need to drive the nail into the wall. (I also wrote down the dimensions of the frame but I didn't end up needing that information.)
3. Arrange the paper templates on the floor, starting with the bottom right corner. It was good to do this phase on the floor (not on the wall) because I ended up rearranging a few times. Because a majority of my frames were black + white mat, I took care to intersperse the non-black + white mat photos throughout so they all wouldn't be clumped together.
4. Tape the paper templates to the wall. Start with the template corresponding to the foot of your stairs. Just put one or two pieces of tape at the top of the paper so it's easy to adjust spacing on the wall if needed. Keep a generally uniform horizontal amount of space between frames (I didn't measure this; just eyeballed) and follow the natural line/angle of your staircase.

5. Grab your hammer and nails and go! Nail holes through the paper, where you indicated your hanging markings (done in step 2C).
6. Tear down the paper. Reuse the paper for an art project or toss in the recycling and hang your frames.
Isn't that fantastic? The most time consuming part was deciding which photos to print and frame. Other than that, the rest of the process was super fast and the great thing about arranging and adjusting the paper templates on the wall first is that you don't need to measure/make pencil marks on the wall!
And best of all, the house feels like a home now. If you have a bare wall, I encourage you to try this method -- you could definitely squeak in this project before the holidays. Jon had a couple of friends over last night who saw the gallery in paper template then finished form and even they were impressed!